
Light but energetic, it is what you need from your dehydrated mountain food.
Prepackaged meals are expensive, take up space, and may not meet your dietary needs.
Going out into the mountains for hiking is an adventure that fills the soul, strengthens the body and cleanses your lungs. However, the weight of the backpack, can make the experience a whole way of the cross. The secret is in the weight you carry!
Many of the hiking shops nowadays have not only boots, Canes, backpacks and accessories; but also prepackaged backpacking meals, but they are expensive and some may have preservatives, chemicals, additives, and other ingredients that may not meet your dietary preferences.
Some of the most recognized brands have evolved to accommodate even hikers' eating styles. From gluten-free to vegan, the diversity is vast. And I must admit that I have tried very good recipes, as well as unpleasant surprises in the middle of the mountain.
What are the advantages of carrying dehydrated food?
Weight: Food contains a large water component that if you carry extra water or camp near a river or lake, it becomes redundant. Rehydrating food is extremely easy and fast. Space: Reducing space (as well as weight) is an obsession of all hikers who frequently go out to the mountains. With less space and less weight, we guarantee ourselves a lighter step and more distance. Less trash. Carrying food in metal or plastic containers that will become garbage is also a concern for the responsible hiker, as we know that we should not leave anything behind on the way. Dehydrated meals can be carried more easily in resealable, easily compactable bags in a single package that you can keep on hand to dispose of in the garbage when leaving the park. Odors and risk of spillage: Foods in plastic containers are always exposed to shocks from a stumble on the road, or a fall. Certainly the idea of having socks wet with sauces or a stinky underwear after a long walk is not pleasant. Useful life. Dehydrating delays the process of oxidation of fruits and the proliferation of bacteria for days, so you can go on an excursion for several days without worrying about the risk of contamination or loss of nutritional properties.
The best solution? Make your own food.
Dehydrating food is extremely easy, and at the same time allows you to be creative and give yourself your own tastes. You know what you like, what you don't; and you can even plan those little treats to give yourself after a long day.
To dehydrate your own food you only need:
Scale for weighing food
Parchment paper
Airtight resealable Ziploc bags
Backpacking stove and pot.
Basically the dehydration process works by circulating hot air that alters the structure of the food without detriment to the nutritional value of the food. It is a slow process, so it takes hours.
Some of your favorite recipes, sauce-based foods such as chili, stew, spaghetti, soup or casseroles work perfectly with just a few hours in the dehydrator. The beauty of this is that you can tailor your meals to any specification: vegetarian, vegan, gluten-free, etc.
Try the vegetarian chili or homemade mac n cheese, the sky's the limit for healthy and delicious food on the mountain.
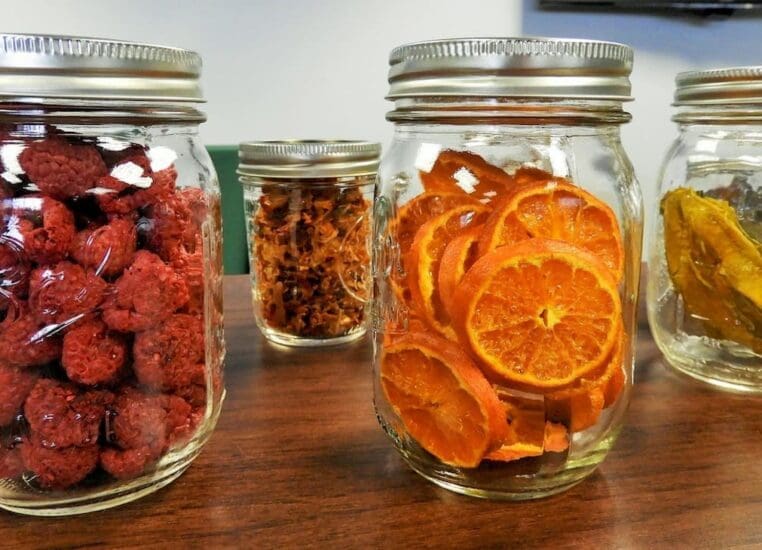
Or start with something easy like making dehydrated vegetables and fruits like strawberries, mangoes (my favorite!), strips of pineapples and apples; and combine them with dried fruits like walnuts. Later, you can make more complex recipes with other types of food, even meat and fish.
Take a pre-dehydrated weight: Using the food scale, weigh a serving for one person of your prepared and cooked food before dehydrating it. Be sure to calculate the weight of the bowl or container the food is in. This will give you a basis weight so you can calculate how much water it will take to rehydrate your food on the go.
Place the food on the parchment paper lined dehydration tray (wax paper or baking paper). This will prevent liquids and small parts from falling through the tray.
Spread the food in a thin, even layer to ensure even dehydration.
Dehydrate overnight or until dry - follow the directions on your home dehydrator.
A completely dehydrated food should be brittle and easy to separate from the parchment paper.
The difference in weight between pre-dehydrated and dehydrated food is the amount of water you will need to add. With a permanent marker, write the contents of the bag and the amount of water to be added on the Ziploc bag.
Rehydrate your food on the go: Put the dehydrated food and the required amount of water in a pot and heat it on your backpacking stove or in the campfire.
Bring to a boil, turn off the stove and add the hot water. Wait for the food to rehydrate for a few minutes. Taste a tablespoon to check if you are fully hydrated.
Be sure to try a few recipes at home first. You can store in the days before the excursion in tightly closed jars and then put them in the hermetic bags. You don't want an epic FAIL on the TRAIL!
Frequently asked questions from our readers:


To dehydrate the fruit, you must first select ripe and fresh fruits. Then wash them and cut them into thin, even slices. You can use a sharp knife or mandolin to get thin slices. Next, place the fruit slices on a dehydrating tray or on a baking rack lined with parchment paper. Make sure the slices don't overlap to allow proper air circulation. Then, place the tray in a food dehydrator or in the oven at a low temperature, around 50-60 degrees Celsius, and let the fruit dehydrate for several hours or even days, depending on the type of fruit and the thickness of the fruit. the slices. It's important to periodically check the fruit to make sure it's drying evenly and flip the slices if necessary. Once the fruit is dry and crisp to the touch, remove it from the dehydrator or oven and allow it to cool completely before storing in airtight containers. In this way, you can enjoy delicious and healthy dried fruit for a long time.
When dehydrating fruit, it is important to note that each type of fruit may require different dehydration times and temperatures. Some fruits, such as apples or bananas, may need pre-treatment to prevent them from browning, such as soaking them in water-diluted lemon juice. In addition, it is essential to ensure that the fruit is completely dry before storing it, as any residual moisture can lead to mold growth. When drying fruits, you can also experiment with different flavors by adding spices like ground cinnamon or ginger. Remember that dried fruit is an excellent healthy snack option, since it retains most of its nutrients.
meat and fish dehydration hiking gear fruits and vegetables nuts carbohydrates dehydration process dehydrating products Hiking
Last modified: April 14, 2024